Showing posts with label CAS Colours & Sketches Challenge. Show all posts

Thursday, November 3, 2022

Krafty Chicks Challenge #636: Stamp Act

 Happy Krafty Chicks Thursday to you! You are in for a treat this month, the Chicks are hosting TWO GUEST DESIGNERS for the month of November. I'm so looking forward to Helen and Mandy's creations and have a bit of fun in the Hen House. See their links below and show them some love with a comment each week.

Welcome November and hello SNOW! Can't complain this year, we had a beautiful October and this is our first official snow fall. We got quite a dumping too! There was no easing into that. Lucky me, I was also on days off so I didn't have to venture out until I have to go to work later today.

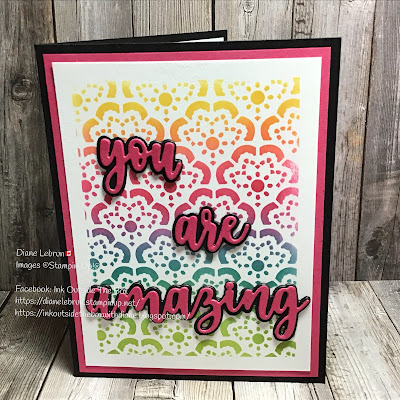
Onto my card for this week's Krafty Chicks Challenge : Stamp Act. As long as something is stamped, be it an image (digi or rubber) or a sentiment, it qualifies for the Stamp Act challenge.

I played along with CAS Colours & Sketches #494 (Colours) and #493 (Sketch) and actually made two cards this week.

Once I cut off the corner of the DSP for the first, it only figures to use the other piece for a second. And I needed two Thank You cards right away for customer orders. These cards came together quickly, the hardest decision is usually how to place the floral die cuts in the background. But not this time because I kept it CAS.

Here's a close up. At first I stamped Rich Razzleberry ink onto Rich Razzleberry card stock but the image was faint. Then I thought of clear embossing powder to make the colour pop and it also adds a bit of shine.

Supplies I used:

I didn't have to decorate an envelope since these Thank You card were dropped into the customers' shopping bags. But I did stamp some foliage in Rich Razzleberry ink on the inside panel. Had I provided an envelope, I would have kept it very similar to the inside with a bit of foliage.

Need more inspiration for the Stamp Act challenge, hop on over to the Krafty Chicks Challenge Blog to get the details. And upload your project so that we can see what's happening in your craft space.

Here's a direct link to our wonderful Design Team's personal blogs:

Leanne's Blog

Melanie's Blog

Lori's Blog (away)

Mandy (Guest Designer) 

 Helen (Guest Designer) 


Friday, June 24, 2022

Krafty Chicks Challenge #617: All Occasions

  Happy Krafty Chicks Thursday to you! But it's Friday and I'm late again.

Welcome to another great challenge week from the Krafty Chicks Challenge Blog. All Occasions is the theme, so pretty much anything goes. Here's my card:


The next retired stamp set for Throwback Thursday (posted Friday) is perfect for All Occasions week: Baby theme. Here I followed along the CAS Colours And Sketches Challenge and Tawny Owl Paperie |Inky Inspiration Facebook group for the sketch.


Love this simple layout. And happy I got to play with the new In Colors 2022-2024 again. They are nice and bright and perfect for a non-traditional baby card.

Supplies I used:

  • Celebrate Baby stamp set: retired
  • Well Said stamp set: retired
  • Thick White card stock: 159229
  • Tahitian Tide card stock: 159261
  • Parakeet Party card stock: 159259
  • Sweet Sorbet card stock: 159268
  • Sweet Sorbet ink pad: 159216
  • Tahitain Tide ink pad: 159210
  • Parakeet Party ink pad: 159208
  • Poppy Parade Stampin'Write marker: 147157 
  • Stampin' Dimensionals: 104430

I kept the inside of the card and the envelope CAS, quick and simple. For the flap of the envelope, I used masking tape on the image to remove the top of the mobile. Stamp in ink, remove the masking tape, stamp on card stock. Repeat.

So now head on over to the Krafty Chicks Challenge Blog for more details about the challenge and for more inspiration for All Occasions week from the Design Team. There's even a place to upload your project at the end. I hope you play along with us and show us what's happening in your craft space.

Here's a direct link to our wonderful Design Team's personal blogs:

Leanne's Blog

Melanie's Blog

Lori's Blog

Diny (Guest Designer) 


Thursday, April 21, 2022

Krafty Chicks Challenge #608: CAS

 Happy Krafty Chicks Thursday to you!

Are you ready for this week's challenge? I'm the hostess and we are looking for CAS, as in Clean And Simple. Here's my card:


I am so sad that this stamp set is retiring and discontinued already. I'm not sure why I haven't shown it much love either, it's such an amazing set with coordinating dies and a sentiment of different occasions. I played along with the Freshly Made Sketches and CAS Colours and Sketches challenges.


Supplies I used:


I like to keep the inside of the card and the envelope just as CAS. I just stamped a few flowers and leaves for a simple decor.

Want some more inspiration?? Go check out the Krafty Chicks Challenge Blog to see what the Design Team have created. Hope you play along and upload your project so that we can see what's happening in your craft space.

Here's a direct link to our wonderful Design Team's personal blogs:

Leanne's Blog

Melanie's Blog

Lori's Blog

Debbie (Guest Designer) 


Thursday, April 14, 2022

Krafty Chicks Challenge #607: Christmas

Yeah, it's Thursday! Time for another great challenge from the Krafty Chicks Challenge Blog. Let's put the spotlight on Christmas and a little Throwback Thursday things too! 

I played along with the CAS Colours & Sketches Challenge #465. I was looking for a quick simple layout and this was perfect for it!

I thought I'd shown one last card using the Perfectly Plaid stamp set since it is retiring on May 2, 2022 but it turns out it didn't make it to the end. They are all sold out! No longer available! So now it's considered a Throwback Thursday product. Lots of items that are on the Last Chance List are already discontinued and no longer available. I highly recommend if you have a few things left on your Wish List, grab it now before it's too late. You can shop at my ONLINE STORE.

Supplies I used:

I like to keep the inside of the card and the envelope just as CAS; a little plaid tree here and there and Ho Ho Ho for good measure.

Head on over to the Krafty Chicks Challenge Blog for more details about the challenge and for more inspiration for Christmas week from the Design Team. There's even a place to upload your project at the end. I hope you play along with us and show us what's happening in your craft space.

Here's a direct link to our wonderful Design Team's personal blogs:

Leanne's Blog

Melanie's Blog

Lori's Blog

Debbie (Guest Designer) 


Sunday, April 3, 2022

Sentiment Sunday: CAS Colours & Sketches Double

 Welcome back to my blog, always nice to have visitors stop in to have a look at what's happening in my craft space. I hope it inspires you to get into yours. Today I’m playing along with CAS Colours & Sketches #463: Double. Or so I thought, until I started writing this blog post. It's a colour challenge AND a sketch challenge into one. Love it! But I forgot the Colour part. Lol! That's right I only used the sketch.

 I don't believe I should have been making cards today. It's been a whirlwind of oopsies from the get go. I will show you some of my bloopers and tell you all about it. But first here's my card:

Nice. Clean. Simple. Well put together. You'd never know my troubles with this one. Started when I saw a Facebook Memory (from 2015) where I told my daughter that we should try this art technique with the boys. Well today was the day I was going to try it. I am using Ink Refills instead of food colour. I didn't think I needed a plastic glass when there's only a bit of water in the bottom. So I repurposed my empty Glitter and Embossing Powder containers. I knew they'd come in handy one day! And who needs a full straw with short "cups", so I cut it into 4 pieces.

Well the joke was on me. You do need longer straws: blowing through short straw means your face is right near the opening. When you blow to create the bubbles, those bubbles hit you in the face. Bubble pop, leaving colour on face. Did NOT take a pic of that! It was light though and didn't stain. Phew! So I got the longer straws. You do need taller cups: small containers means there's no room for the air that I was blowing (to create bubbles) to freely move in the container, in so spilled over, creating a little mess. So I got the plastic cups.


Once I started playing with the bubbles, it was fun! I used different paper to determine which would have the best effect. Glossy had the best bubbles showing but faint background colour, not my favourite. Photo paper created great background colour and perfect bubble outlines. Shimmery card stock had the same effect as the photo paper but absorbed the colour more, so less crisp bubble outline.

Now that I'm done with the technique, I poured the coloured water back into the smaller containers and put away. Maybe next time the grand kids come over, we can make bubble art. Or heck I might even use this technique for Crafty Inkettes United Card Club in a couple of weeks.

Now I can create my card. I ended up using the Shimmery paper since it's current Stampin' Up! card stock. I cut it to size, layered it onto a Basic Black matte, and tossed it to the side. Literally! Not paying attention where it landed. On an opened Memento ink pad but I don't know that yet. I heat emboss my sentiment, add dimensionals to the back and now grab my background piece. I'm ready to freak! 

But let's try this I tell myself (out loud, cuz I'm getting a professional opinion). I randomly tapped my ink pad to the panel creating some lines, giving it a mixed media look. Nailed it!!! Now moving on.

Here’s a close up of the bubbles and the black random lines. I forgot to take the Nailed It pic.

Supplies I used: (I'll come back after work this evening to create the product links)

  • Ornate Thanks stamp set: 149471
  •  Just Jade card stock: 153079
  • Basic Black card stock: 121045
  • Basic White card stock: 159276
  • Memento ink pad: 132708
  • VersaMark ink pad: 102283
  • Just Jade ink refill: 153121
  • Heat Tool: 129053
  • White Embossing powder: 155554
  • Gold Elastic cord: retired
  • Stampin' Dimensionals: 104430

I used a little left over card stock from when I trimmed my bubble pattern paper and matted it with the black. When it came to the envelope, I realized that I put everything away. There was really no other way I could think of, at that moment, to finish it other than more bubbles. So I brought it all back out, created my envelope, cleaned up and put everything away. AGAIN! The end!

I won't be entering my card in the challenge since I didn't actually follow the challenge but I'd thought I'd show it to you anyway, in case you wanted to play along too. Hurry though, challenge ends tomorrow. This is what I was suppose to be following:

Hope you enjoyed my humbling crafternoon story and are inspired to create something wonderful in your craft space.


Thursday, March 17, 2022

Krafty Chicks Challenge #603: CAS and Throwback Thursday

 Happy Krafty Chicks Thursday to you! And Happy St Patrick's Day! I don't usually celebrate this day, unless the grand kids are over and they want to try to catch the Leprechaun. We almost got him last year! Caught him by his back pocket and to save himself, he ripped it off and left the coins behind.

 Are you ready for this week's challenge? I'm the hostess and we are looking for CAS, as in Clean And Simple. Here's my card:


 Like I mentioned earlier, I don't usually celebrate and I definitely don't make cards for this holiday but the next alphabetical stamp set in my retired pile had the sentiment and four leaf clover in it. So how could I ignore that gentle nudge from the universe?

I also created this card following CAS Colours & Sketches. I'm too late to enter their gallery but it's still a great challenge to play along with and deserve a mention.


One: I have two grand sons. They both require a card, to be fair! Two: This was my original card for today's Krafty Chicks Challenge and Throwback Thursday combo, just without the gold. And I  didn't like it. It wasn't coming along as I envisioned it in my head. So I tossed it aside. Made the other card really CAS with no added layers and then I found my Gold marker. I pulled back the original, coloured in LUCK and the stars, added a little gold bling and now I'm happy again!

Supplies I used:

I like to keep the inside of the card and the envelope just as CAS, just a little ink will do this time.

Want some more inspiration?? Go check out the Krafty Chicks Challenge Blog to see what the Design Team have created. Hope you play along and upload your project so that we can see what's happening in your craft space.

Here's a direct link to our wonderful Design Team's personal blogs:

Leanne's Blog

Melanie's Blog

Lori's Blog

Tenia (Guest Designer) 


Saturday, January 22, 2022

Late Throwback Thursday Card

 Good day everyone! It's Saturday, hope you have great things planned for the weekend. I will be working evenings but crafting by day. I created this really fun card that I posted to Facebook on Thursday on my group page Diane's Craft Space. See the post here.

It's a new themed feature post "Throwback Thursday" that may not happen every Thursday but often enough to call it a theme. The goal of this new feature is to get you using your old stamp sets, old Designer Series Paper, retired card stock, retired embossing folder and dies, etc. There's still LOTS of life left in these products, they shouldn't be pushed to the wayside and ignored. 

On the Facebook post, I asked: Can you name the Retired products used on this card?? Hint: there's three. Want the answer right away? Scroll to the Supplies Used section to find out if you're right.


I am a horrible fussy cutter. Are you one too? Here's a tip:
- Use your Basic Black Stampin' Write marker to colour in the white space outside of the outlined image. Ta Daaaa! No one will know.

For a more professional finish, here's another tip:
- Since you have the marker handy, colour your side edges. No white showing. Finished look.


Here's a close up to see the professionally finished edge. 

What do you think?? I like it much better.


Supplies used:


 And to finish of the card set, I added strips of DSP and stamp and coloured the hat image. Lots of white space to write a message and the address. No more naked envelopes and plain insides. Let the recipient start smiling upon receiving.

One more tip: If your DSP falls a little short for the envelope flap, measure it to see if there's still enough of the adhesive to close it. If the answer is yes, adhere the DSP flush with the top edge and trim off the white space. Another option: adhere the DSP flush with the end of envelope flap and add a strip of coordinating card stock to the top. Trim to fit.

For today's card, I played along with the following challenges. Click on the images to visit their blogs.


That's all for today Thank you for stopping in and enjoy your weekend. Hopefully you can squeeze in some craft time

Monday, January 17, 2022

CAS Colours & Sketches: Challenge #452 - Sketch

Today I have a treat for you. I played along with the CAS Colours & Sketches Challenge this week and had a blast creating this card for you.

I used two new products from the January-June Mini Catalogue 2022, the decorative masks (stencils) and dies. I absolutely love the rainbow effect that the Blending Brushes helped me create.

And this is how I did it: 

  • Used *Washi tape to create white border. *See tips below*. 
  • Selected my colours. 
  • I used a **separate blending brush for each colour. 
  • Secured my decorative mask with Washi tape in the center so it wouldn’t shift. 
  • Started ***blending, one colour at a time, slightly overlapping each colour to create a new colour.

When I removed the mask, I was astounded by my results. Maybe it’s the rainbow, maybe it’s the great blending, maybe it’s the vibrancy of the colours, whatever it is, I’m so HAPPY!

 
Next I added scraps of ****adhesive sheets to die cut my sentiment. Do you see anything wrong with the die cut picture?? I set my dies on the wrong side of the card stock. Don't worry see tips below ***** on how I fixed it. OH Mylanta! These words tried my patience. Albeit was my own fault, going too fast, not thinking it through, not using adhesive sheets often enough. I sent the dies through a second time, this time on the correct side, but when I went to adhere the two layers together (my fix), there was adhesive on both sides that would stick together. If you know me, you know that I strongly dislike waste and that's exactly what this would be. So try number three, no adhesive. Stuck that onto my first attempt and voila: dimension. I saved one set of die cuts to use another time.
 

Supplies I used:


I finished off the inside, clean and simple with a bit more masking and a Melon Mambo strip. The envelope looks amazing with the added pop of colour. Honestly was lots of fun! Will do it again soon too.


Now for all the tips I promised. I'd like to call these lessons learned but I have a feeling, I may repeat some. 

*Washi tape: any washi tape will do but FIRST DO THIS: take some of the tackiness off but sticking to your shirt/pants. A really tacky washi can/will pull some of the card stock when it's removed. If this happens to you, like it did to me (you might even be able to see it a bit in the white border, look closely), use a sanding block (I have an old Stampin' Up! one but a hardware store one works too) to gently rub the card stock smooth. Take your time.

**Blending Brushes: have one for every colour of the rainbow. You don't need one for every Stampin' Up! colour though. I bought a colour coded set before Stampin' Up! came out with theirs so only purchased one set of three brushes. They are high quality and if I didn't already own the others, I would buy definitely buy these. I have a RED brush for all shades of red. I have a YELLOW one for all shades of yellow, one for blue, green, orange, pink, purple, gray, and brown. To change between shades of a colour, simply rub brushes on scrap paper till it runs out.

***To blend: gently rub your brush on the ink pad, dab on scrap paper once or twice (this removes the harshness of colour), then start off the edge a bit and rub gently in small circular motion. You can rub a bit deeper as you run out of colour on your brush, especially where you are trying to blend two colours together.

****Adhesive Sheets: don't throw out your scraps pieces. I ended up using up all those in the pic. As you can see in the following pic, I didn't get full coverage of the words. It doesn't matter! as long as it's mostly covered, it will stick down. Another tip (very imporant): DON'T PUT THE DIE ON THE ADHESIVE SIDE. See next tip to fix it if you do.

*****If you put the die on the adhesive side, here's how to fix it: die cut more card stock with no adhesive. Stick it on top of "mistake" piece. I use a brayer to firmly set together. This will add dimension to your die cut. And you are not wasting but enhancing your die cut.

Here's the link again to play along with CAS Colours & Sketches Challenge and the sketch for quick reference:

Give it a try and have an amazing day!