
Today I have a treat for you. I played along with the CAS Colours & Sketches Challenge this week and had a blast creating this card for you.
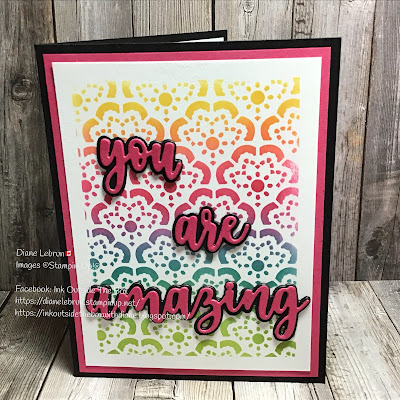
I used two new products from the January-June Mini Catalogue 2022, the decorative masks (stencils) and dies. I absolutely love the rainbow effect that the Blending Brushes helped me create.

And this is how I did it:
- Used *Washi tape to create white border. *See tips below*.
- Selected my colours.
- I used a **separate blending brush for each colour.
- Secured my decorative mask with Washi tape in the center so it wouldn’t shift.
- Started ***blending, one colour at a time, slightly overlapping each colour to create a new colour.

When I removed the mask, I was astounded by my results. Maybe it’s the rainbow, maybe it’s the great blending, maybe it’s the vibrancy of the colours, whatever it is, I’m so HAPPY!


Supplies I used:
- Granny Apple Green ink pad: 147095
- Bermuda Bay ink pad: 147096
- Melon Mambo ink pad: 147051
- Daffodil Delight ink pad: 147094
- Basic Black card stock: 121045
- Melon Mambo card stock: 115320
- Basic White card stock: 159276
- Stampin' Cut & Emboss machine: 149653
- Amazing Thanks dies: 157816
- Butterflies & Flowers Layering Decorative Masks: 158142
- Blending Brushes: 153611
- Multipurpose Liquid Glue: 110755
- Multipurpose Adhesive Sheets: 152334

I finished off the inside, clean and simple with a bit more masking and a Melon Mambo strip. The envelope looks amazing with the added pop of colour. Honestly was lots of fun! Will do it again soon too.
Now for all the tips I promised. I'd like to call these lessons learned but I have a feeling, I may repeat some.
*Washi tape: any washi tape will do but FIRST DO THIS: take some of the tackiness off but sticking to your shirt/pants. A really tacky washi can/will pull some of the card stock when it's removed. If this happens to you, like it did to me (you might even be able to see it a bit in the white border, look closely), use a sanding block (I have an old Stampin' Up! one but a hardware store one works too) to gently rub the card stock smooth. Take your time.
**Blending Brushes: have one for every colour of the rainbow. You don't need one for every Stampin' Up! colour though. I bought a colour coded set before Stampin' Up! came out with theirs so only purchased one set of three brushes. They are high quality and if I didn't already own the others, I would buy definitely buy these. I have a RED brush for all shades of red. I have a YELLOW one for all shades of yellow, one for blue, green, orange, pink, purple, gray, and brown. To change between shades of a colour, simply rub brushes on scrap paper till it runs out.
***To blend: gently rub your brush on the ink pad, dab on scrap paper once or twice (this removes the harshness of colour), then start off the edge a bit and rub gently in small circular motion. You can rub a bit deeper as you run out of colour on your brush, especially where you are trying to blend two colours together.
****Adhesive Sheets: don't throw out your scraps pieces. I ended up using up all those in the pic. As you can see in the following pic, I didn't get full coverage of the words. It doesn't matter! as long as it's mostly covered, it will stick down. Another tip (very imporant): DON'T PUT THE DIE ON THE ADHESIVE SIDE. See next tip to fix it if you do.

*****If you put the die on the adhesive side, here's how to fix it: die cut more card stock with no adhesive. Stick it on top of "mistake" piece. I use a brayer to firmly set together. This will add dimension to your die cut. And you are not wasting but enhancing your die cut.
Here's the link again to play along with CAS Colours & Sketches Challenge and the sketch for quick reference:

Diane your blended stencilled background is lovely and really allows your layered diecuts to shine. Great tips shared in your post too! Thanks for playing along with my sketch challenge over at CAS Colours & Sketches this week!
ReplyDeleteSo very colourful! Thanks for playing along with us at CAS Colours & Sketches!
ReplyDelete