Monday, January 17, 2022

CAS Colours & Sketches: Challenge #452 - Sketch

Today I have a treat for you. I played along with the CAS Colours & Sketches Challenge this week and had a blast creating this card for you.
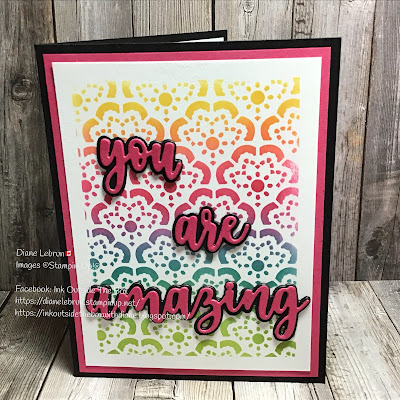
I used two new products from the January-June Mini Catalogue 2022, the decorative masks (stencils) and dies. I absolutely love the rainbow effect that the Blending Brushes helped me create.

And this is how I did it: 

  • Used *Washi tape to create white border. *See tips below*. 
  • Selected my colours. 
  • I used a **separate blending brush for each colour. 
  • Secured my decorative mask with Washi tape in the center so it wouldn’t shift. 
  • Started ***blending, one colour at a time, slightly overlapping each colour to create a new colour.

When I removed the mask, I was astounded by my results. Maybe it’s the rainbow, maybe it’s the great blending, maybe it’s the vibrancy of the colours, whatever it is, I’m so HAPPY!

 
Next I added scraps of ****adhesive sheets to die cut my sentiment. Do you see anything wrong with the die cut picture?? I set my dies on the wrong side of the card stock. Don't worry see tips below ***** on how I fixed it. OH Mylanta! These words tried my patience. Albeit was my own fault, going too fast, not thinking it through, not using adhesive sheets often enough. I sent the dies through a second time, this time on the correct side, but when I went to adhere the two layers together (my fix), there was adhesive on both sides that would stick together. If you know me, you know that I strongly dislike waste and that's exactly what this would be. So try number three, no adhesive. Stuck that onto my first attempt and voila: dimension. I saved one set of die cuts to use another time.
 

Supplies I used:


I finished off the inside, clean and simple with a bit more masking and a Melon Mambo strip. The envelope looks amazing with the added pop of colour. Honestly was lots of fun! Will do it again soon too.


Now for all the tips I promised. I'd like to call these lessons learned but I have a feeling, I may repeat some. 

*Washi tape: any washi tape will do but FIRST DO THIS: take some of the tackiness off but sticking to your shirt/pants. A really tacky washi can/will pull some of the card stock when it's removed. If this happens to you, like it did to me (you might even be able to see it a bit in the white border, look closely), use a sanding block (I have an old Stampin' Up! one but a hardware store one works too) to gently rub the card stock smooth. Take your time.

**Blending Brushes: have one for every colour of the rainbow. You don't need one for every Stampin' Up! colour though. I bought a colour coded set before Stampin' Up! came out with theirs so only purchased one set of three brushes. They are high quality and if I didn't already own the others, I would buy definitely buy these. I have a RED brush for all shades of red. I have a YELLOW one for all shades of yellow, one for blue, green, orange, pink, purple, gray, and brown. To change between shades of a colour, simply rub brushes on scrap paper till it runs out.

***To blend: gently rub your brush on the ink pad, dab on scrap paper once or twice (this removes the harshness of colour), then start off the edge a bit and rub gently in small circular motion. You can rub a bit deeper as you run out of colour on your brush, especially where you are trying to blend two colours together.

****Adhesive Sheets: don't throw out your scraps pieces. I ended up using up all those in the pic. As you can see in the following pic, I didn't get full coverage of the words. It doesn't matter! as long as it's mostly covered, it will stick down. Another tip (very imporant): DON'T PUT THE DIE ON THE ADHESIVE SIDE. See next tip to fix it if you do.

*****If you put the die on the adhesive side, here's how to fix it: die cut more card stock with no adhesive. Stick it on top of "mistake" piece. I use a brayer to firmly set together. This will add dimension to your die cut. And you are not wasting but enhancing your die cut.

Here's the link again to play along with CAS Colours & Sketches Challenge and the sketch for quick reference:

Give it a try and have an amazing day!


Thursday, January 13, 2022

What's Going On Wednesday?? January 12, 2022

Sorry this post is a day late, I blame technology. Really it's the user and technology. OK it's me, I'm the user, and not very tech savvy. I considered postponing this NEW Weekly Update and just starting next week to save face but that's not fair to you. Better late than never they say!


A Wednesday update about what is going on in the world of Stampin' Up! this week.

SAFARI CELEBRATION, the upcoming February Paper Pumpkin kit. Answer the call of the wild—and your creativity—with the Safari Celebration Paper Pumpkin Kit. This playful, party-themed kit includes all the goodies and gear you need to create cards and coordinating envelopes in safari-inspired shapes and patterns you’ll go wild for! Make every occasion a celebration with this month’s amusing animals, beautiful botanicals, and celebratory sentiments.

  • This month’s kit contains enough elements to create 9 cards—3 each of 3 designs—and 9 coordinating envelopes. This all-inclusive kit includes printed card bases, die-cut paper pieces, embellishments, adhesive, and more!
  • The Safari Celebration Paper Pumpkin Kit includes a Rich Razzleberry Classic Stampin’ Spot!
  • This kit’s stamp set is an uplifting one! Make every occasion a celebration with sentiments that say “yay!”, “fantastic!”, and other fun phrases.
  • Card size: 4-1/4" x 5-1/2" (10.8 x 14 cm)
  • Envelope size: 4-1/2" x 5-3/4" (11.4 x 14.6 cm)
  • Coordinating colors: Bumblebee, Fresh Freesia, Pear Pizzazz, Rich Razzleberry, Soft Succulent, Soft Suede

Get your subscription here:  https://www.paperpumpkin.com/en-ca/sign-up/?demoid=2042209


LIGHT THE CANDLES kit has been added to the Kits Collection! Light the Candles—a birthday card kit you’ll be using all year! This kit features bright colors, sparkly embellishments, and a simple peek-through technique that will make you want to party. These cards are perfect for wishing the happiest of birthdays, or to use as invitations to an exciting birthday bash!

  • Kit contains enough supplies to create 8 cards—4 each of 2 designs—and 8 coordinating envelopes.
  • Includes printed card bases, printed die cuts, adhesive, embellishments, and a clear block.
  • Includes an exclusive stamp set and a Coastal Cabana Classic Stampin’ Spot.
  • Finished card size: 5-1/2" x 4-1/4" (14 x 10.8 cm)
  • Coordinating colors: Coastal Cabana, Daffodil Delight, Magenta Madness, Mango Melody, Night of Navy

Get your kit here:  https://www.stampinup.ca/products/light-the-candles-card-kit-english?demoid=2042209


PREPAID PAPER PUMPKIN DURING SALE-A-BRATION is the perfect time to subscribe. Why? During Sale-A-Bration, you can earn free Stampin’ Up! products with the purchase of a prepaid Paper Pumpkin subscription! New, existing, loyal, and even canceled or suspended subscribers can reap the benefits of this amazing offer.

Here’s what you can earn when you buy a prepaid Paper Pumpkin subscription:

When purchasing a 6 month subscription, you save $1 per kit. The better deal however is the 12 month subscription: pay for 11 and get the 12th free (save $28 plus shipping and tax) AND get Hostess Rewards. That's more FREE product ($30 value).

Order the 3 month subscription here: https://www.stampinup.ca/products/3-month-prepaid-paper-pumpkin-subscription?demoid=2042209

Order the 6 month subscription here: https://www.stampinup.ca/products/6-month-prepaid-paper-pumpkin-subscription?demoid=2042209

Order the 12 month subscription here: https://www.stampinup.ca/products/one-year-prepaid-paper-pumpkin-subscription?demoid=2042209


SALE-A-BRATION (SAB) is the first "most wonderful time of the year". It's where you get FREE product for shopping with me, hosting a qualifying party, and/or joining my team between January 4, 2022 - February 28, 2022. See the brochure here: https://issuu.com/stampinup/docs/sab22_en_ca?fr=sN2M0OTQ1MTA2ODU

How does SAB work?? There's three ways to benefit.

Shop with me: Choose a FREE SAB product for every $60 or $120 you spend (before shipping and tax). You can shop from the Annual Catalogue  (AC) or the January-June Mini Catalogue (JJ2022).

Host a qualifying party: Make treasured memories and share some fun creative time with others when you host a party. Host now and both you and your guests can earn FREE SAB products. Plus place any party order or personal order of $375 or more and receive the exclusive Calming Camellia stamp set for FREE!

Join my team: When you become an Independent Demonstrator, you join a supportive community of others that share your passion for creativity. Join now and select $165 of products and only pay $135, that includes the shipping and tax. If you join my team during SAB, you'll also get your choice of any TWO stamp sets for FREE! For more information on joining: https://dianelebrun.stampinup.net/join_now


JANUARY-JUNE 2022 MINI CATALOGUE (JJMC2022) is now available to order from. It's your passport to stunning seasonal projects! It contains all the products you’ll need to craft, create, and celebrate during Valentine’s, Easter, and more. See the catalogue here: https://issuu.com/stampinup/docs/jj22_en_ca?fr=sYzg3ZTQ1MTA2ODU


Now you are in the know! Thank you for stopping in for a visit. Any questions about any of these promotions, don't hesitate to contact me at su.ink.outside.the.box@gmail.com

Krafty Chicks Challenge #594: Christmas

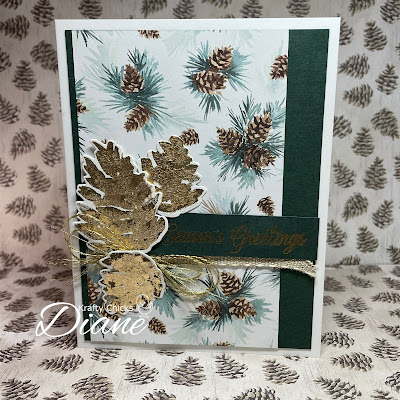
Yeah, it's Thursday! Time for another great challenge from the Krafty Chicks Challenge Blog. Let's put the spotlight on Christmas this week! Here's my card:


I had fun making this card. First time using the Gilded Leafing (I made two cards back in December). Tip: don't breathe near it! It's actually quite easy to use, just a few steps and everything is golden! For the sentiment though, I used gold embossing powder. I'll admit to trying the Gilded Leafing but that was a mess.

 
You can see the sentiment better in this close up. But I also wanted to show you the bow. This thread is retired now but I can never seem to get rid of ribbons and threads. I just did a few loops around my hand and then tied a smaller thread to the middle. I fiddled a bit, pulling some longer loops and creating smaller ones in the process and then frayed the ends.
 

Supplies I used:


I like to keep the inside of the card and the envelope CAS. Here I added some pine cones, a strip of Evening Evergreen to the inside of the card and the DSP to the flap of the envelope to tie them all together.

Head on over to the Krafty Chicks Challenge Blog for more details about the challenge and for more inspiration for Christmas week from the Design Team. There's even a place to upload your project at the end. I hope you play along with us and show us what's happening in your craft space.

Here's a direct link to our wonderful Design Team's personal blogs:

Leanne's Blog

Melanie's Blog

Lori's Blog

Darnell (Guest Designer) 


Monday, January 10, 2022

Global Design Project #324: Case the Designer

 Welcome back to my blog this cold wintry Sunday. Things are warming up though. Today we are at -18C (feels like -24C), all of last week was -23C to -27C with windchills freezing our butts at -37. And then we have tomorrow, temps are going up to -4C for a couple of days and a couple more at +3C. Now who can complain about a winter like that?

I decided to play along with Global Design Project this morning, not realizing that the challenge ended soon after I started. Just because I didn't make the deadline though, doesn't mean I wasted my time. I had fun and you're going to love it. Here it is:

The theme is CASE (Copy And Selectively Edit) the designer. 

I promised to showcase the Friendly Hello Designer Series Paper so this was the right layout. Of course I had to use my little birdie friend again. I had a hard time deciding how I would pop him. You should have seen the mess on my desk as I tried different things but in the end, I like what I came up with.

Supplies I used:

To decorate the envelope, I stamped the leaf image randomly on the back flap and a couple more in the corners on the front. For the inside of the card, a little DSP and a thin strip of Fresh Freesia finishes it off.

Hope you like this card as much as I do. Want to see more inspiration using this layout? Head on over to the Global Design Project blog, scroll to the bottom and check out all the entries.

Happy Stampin'


Thursday, January 6, 2022

Krafty Chicks Challenge #593: Stamp Act

 Happy Krafty Chicks Thursday to you!

Welcome January and a whole New Year before us. Do you set Resolutions?? I've given up on actual resolutions but I do plan out the goals I'd like to achieve and work on making myself a better person in all aspects of my life, like health and nutrition, finances, family, personal attributes (short tempered these days, that needs to change), adding more craft time and dedicating more time to grow my business in terms of classes, online presence and social media.

Onto my card for this week's Krafty Chicks Challenge : Stamp Act. As long as something is stamped, be it an image or a sentiment, it qualifies for the Stamp Act challenge.

This was a really fun card to make. It's a new product in the January-June Mini Catalogue 2022 (JJMC2022). Ladybugs are one of my favourite summer things, they make me smile. I have a few garden painted rocks, a metal yard decoration, my grandson also painted a ceramic for my birthday last year because he knew how much I liked them. It pretty much ranks as high a Gnomes for winter for me. And I will most likely buy all the Ladybug stamp sets from here on out.

Here's a tip for Builder Punches: On over sized scrap paper (this is retired Cucumber Crush card stock 4"x3"), punch out the ladybug as a template. Use your Stamparatus to line up the stamps in there rightful spot. I put one image on each side of the platform since I'm using two different colours. I needed to stamp image twice to get a true solid colour. When done stamping, remove your template (store it in the stamp case for future use), line up your Builder Punch with stamped image and punch. If you are using the same colour for all elements on the Builder Punch, line them on on the same side of the platform, stamp all at once, punch all at once.You could also line them up on a clear block if you only need to stamp once.

Supplies I used:


I went with real simple for inside of the card and the envelope. A little DSP and an extra ladybug is all it needs to finish it off.

Need more inspiration for the Stamp Act challenge, hop on over to the Krafty Chicks Challenge Blog to get the details. And upload your project so that we can see what's happening in your craft space.

Here's a direct link to our wonderful Design Team's personal blogs:

Leanne's Blog

Melanie's Blog

Lori's Blog

Darnell (Guest Designer) 


Monday, January 3, 2022

Thanks, Artistically Inked

Thanks for coming to my blog today!

New Year, New Dreams, New Goals and Taking Action! This is what I told myself on New Year's Eve before the ball dropped. I love card making but I never make time for it. Netflix and Prime TV always win my down time. Well I'm going to change that for 2022!

Today I am participating in two challenges with one card doing double duty. Here's the card:

 Many demonstrators around the world are being highlighted internationally by Kylie Bertucci and you are able to VOTE for my project. The top ten winners will get to be part of an international blog hop later in the month, so please vote for my project. You can do that HERE.

Have you heard of Kylie Bertucci?? She is a very successful Stampin' Up! demonstrator in Australia. Every month she hosts an International Blog Hop. Every month, I say I'm going to play along but I don't. New Year, New dreams, New Goals And Take Action! And here I am, playing along.

Supplies I used:


 As you know by now, I love decorating the inside of the card and the envelope. Here I kept it really simple with stamped flowers and leaves.

I also played along with the demonstrators on a Facebook group called CASEing The Catty. This week's theme: Case the Mini Catty Cover.


If you haven't done so already, I would really appreciate it if you took a minute to VOTE for my card. Look for entry #19. Just click on the heart in the upper right-hand corner.

Thank you for stopping in to see what's happening in my craft space.

Diane

Thursday, December 30, 2021

Krafty Chicks Challenge #592 : Anything Goes

Happy Krafty Chicks Thursday!


I can't believe we are at the end of December and the end of the year already. Boy, how the time flies! Hope you had a great Christmas! Ours was exciting with the little kids around, and loud.  They ran around the house, played games, painted ceramic ornaments, and opened presents. And I think we only had one melt-down. 

It's an AnyThing Goes kind of challenge over on the Krafty Chicks Challenge Blog this week. These are the easiest kind of cards to make since I can play with any theme I want, almost like there aren't any rules. So here's my card:

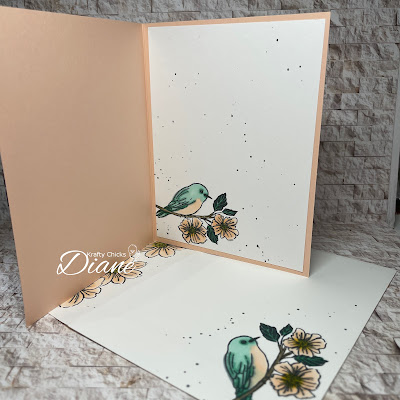
I went with a birthday theme, as I don't have as many as I thought in my stash. It's time to rebuild! Isn't this a pretty bird?? This is a new set that will be available come January 4th, 2022 for FREE. Sale-A-Bration (SAB) is back January and February. For every $60 you spend in product (does not include shipping and tax), you get to pick an item for FREE. I love that word: FREE! This stamp set comes with a coordinating Designer Series Paper (DSP) and is a $120 Level product.

Supplies I used:

 
I kept the inside of the card and the envelope CAS by simply stamping and colouring the bird and adding a few more splatters.

I also played along with the following challenges:
Stampin' Up! Only Challenges: #291, theme CELEBRATIONS

Head on over to the Krafty Chicks Challenge Blog for more details about the challenge and for more inspiration for Christmas week from the Design Team. There's even a place to upload your project at the end. I hope you play along with us and show us what's happening in your craft space.

Here's a direct link to our wonderful Design Team's personal blogs:

Leanne's Blog

Melanie's Blog

Lori's Blog

Kylie (Guest Designer)